Enhanced Input: What you need to know

Controlling Unreal Engine games and experiences through mouse and keyboard, controller, touch, or various accessible inputs is key to defining the player experience. Without these inputs, players would not be able to move characters, navigate through the user interface, nor interact with anything at all.
Historically, Unreal Engine inputs have been established in the Project Settings via a variety of Action and Axis Mappings. While effective, the implementation was basic, leaving developers to their own devices to implement any form of complex input functionality.
In Unreal Engine 4.26, Epic Games released a new experimental object-oriented input system that significantly improved upon the older system: Enhanced Input. Dead zones, triggers, modifiers, input action stages, runtime player mappings, and many more useful input-related features were brought to the forefront. This new input system became the default as of Unreal Engine 5.1 with the deprecation of the older system.
The basics
While the Enhanced Input system may initially appear overwhelming with its abundance of innovative features, it’s important to remember that its complexity is also its strength. With a solid grasp of the fundamentals, you’ll find this powerful tool not only comprehensible, but also remarkably intuitive to use.
What is Enhanced Input?
The Enhanced Input system, an object-oriented input feature, made it’s debut in Unreal Engine 4.26, later becoming the default input methodology in Unreal Engine 5.1.
This system introduces a myriad of advanced capabilities including ---
- An Enhanced Input Local Player Subsystem, which serves as the primary interface for communicating with the input system.
- A versatile range of input objects, offering impressive flexibility in defining inputs – from the simplest of clicks to the most complex of combos.
- Highly customizable input mappings are made possible through a system of triggers and modifiers, enabling precise and diverse control configurations.
- Compatibility with inputs established through plugins, offering flexibility and interoperability for developers.
Beyond these key features, the Enhanced Input system encompasses an array of additional functionalities that further streamline and refine the developer’s experience.
What are the essential components that make up Enhanced Input?
There are multiple components that make up the Enhanced Input system – each with its respective role and functionality.
Input Action
Input Actions serve as the foundation for actions initiated by the player’s input. These can include a wide range of in-game responses such as character movements, jumping, sprinting, or interactions – each defined by unique Input Action objects.
These objects are tasked with outlining additional attributes that provide more specific details about the action. These attributes include —
- The value the action should convey
- Any modifiers that should impact the action
- Any triggers that the action should consider
Beyond defining the action, every Input Action object also generates a corresponding event listener. This event listener can be added to any player-controlled object (e.g., Player Controller, Player Character, widgets, etc.) to execute the desired logic when the Input Action has been started, triggered, canceled, or completed.
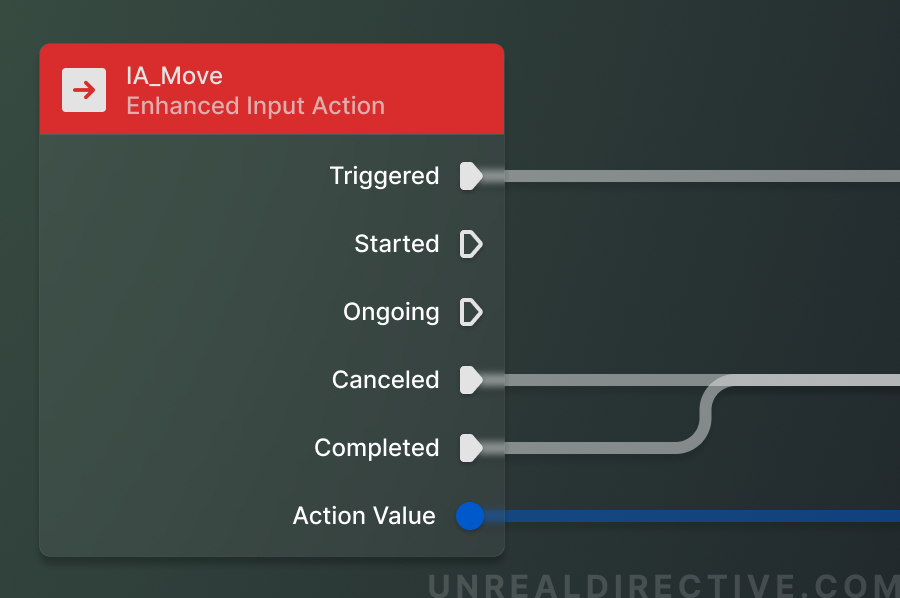
However, it’s crucial to understand that an Input Action’s role is limited to defining the action. It doesn’t assign that action to any particular input – this responsibility falls to the Input Mapping Context.
Input Mapping Context
The Input Mapping Context, like its name, is where Input Actions are given context. This context encapsulates several aspects —
- The specific input that prompts the action
- Any additional modifiers that should impact the action
- Any supplementary triggers that need to be considered for the action
- Whether the input can be re-mapped by the player
- And more
To cater to a diverse range of scenarios, it’s recommended to create multiple Input Mapping Contexts. For instance, different contexts could be devised for —
- Keyboard & Mouse Player Controls
- Gamepad Player Controls
- Mobile Player Controls
- UI Navigation
- Spectator Controls
Or even specified for specific actions within your game or experience.
Like Input Actions, the Input Mapping Contexts role is only to provide context to Input Actions and isn’t in effect by default. To activate a Input Mapping Context, it needs to be added via the Enhanced Input Local Player Subsystem.
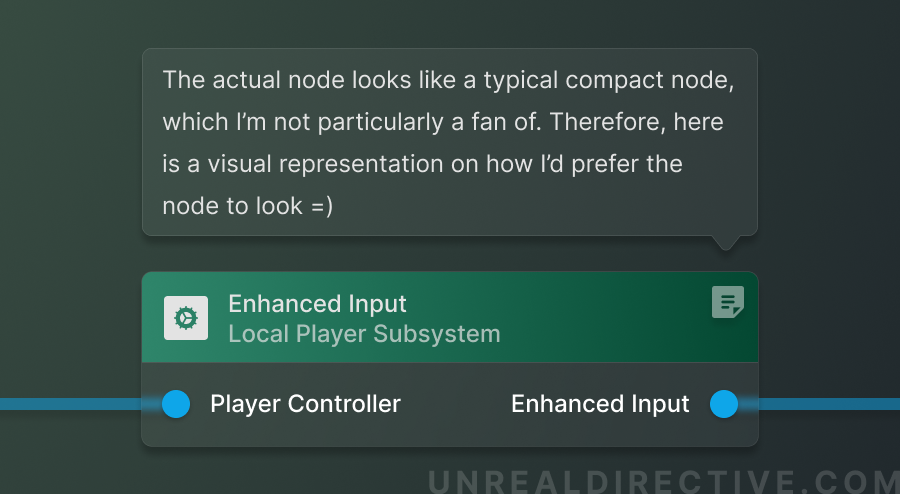
Enhanced Input Local Player Subsystem
The Enhanced Input Local Player Subsystem is a subsystem that controls the player input. This is where you will —
- Add or remove Input Mappings
- Adjust player input mappings
- Inject Input Actions
This subsystem should ideally be accessed and set up from within the Player Controller. However, you can optionally access it in other objects if you reference the desired Player Controller.
Does Enhanced Input use any of the previous input functionality?
Absolutely. despite its advancements, Enhanced Input continues to utilize the Force Feedback Effect and Force Feedback Attenuation, two prominent features in the engine.
Here’s a quick explanation of these two features —
- Force Feedback Effect: This feature introduces haptic feedback (like vibrations) that enrich the player’s gaming experience by heightening the sense of immersion. The intensity, duration, and location of this feedback can be tailored to deliver any desired sensation.
- Force Feedback Attenuation: This complementary feature controls the haptic feedback’s intensity as a function of distance and/or time, ensuring the feedback remains accurate and engaging over the duration of the game.
What are the requirements to use Enhanced Input?
To get Enhanced Input up and running in your Unreal Engine project, you’ll need to satisfy a few requirements.
If you’re working within Unreal Engine 5.1 or later, then you can go ahead and skip this section as Enhanced Input has already been setup by default.
Supported engine versions
To get the most out of Enhanced Input, make sure you’re working within Unreal Engine 5. While supported in Unreal Engine 4.26 and 4.27, it’s only experimental and you may come across critical issues.
4.25-
unsupported
4.26 - 4.27
experimental
5.0+
supported
Enabling the Enhanced Input plugin
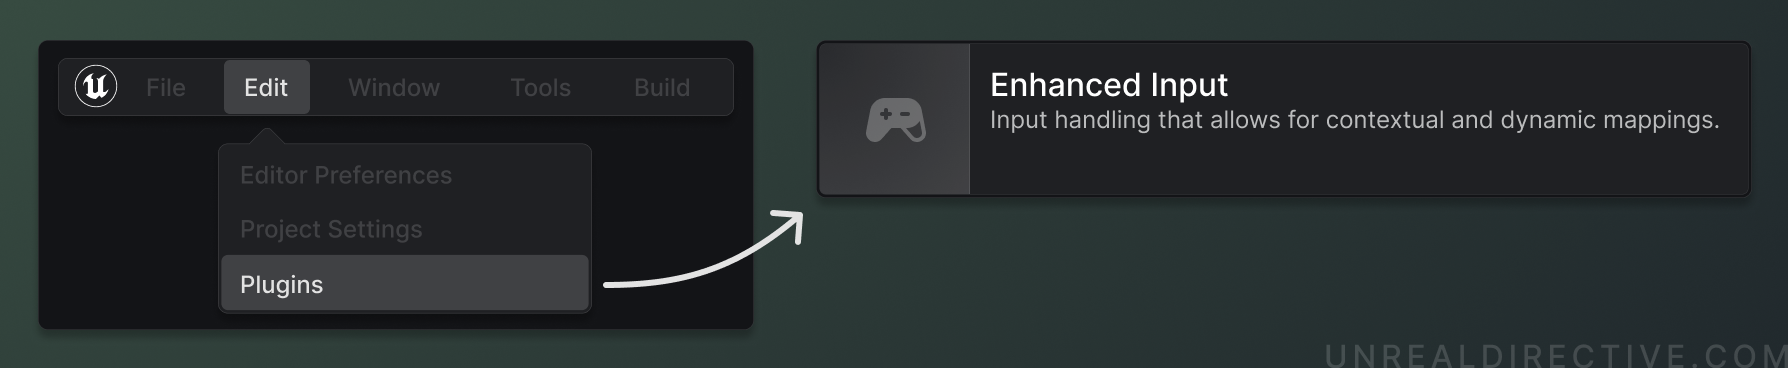
Like many modules in Unreal Engine, Enhanced Input has it’s own plugin that needs to be enabled. Navigate to the your plugins window, search Enhanced Input, and enable the plugin.
Optionally, you can also enable the Common UI plugin to provide you with advanced UMG widgets that interface directly with Enhanced Input.
Setting the project up for Enhanced Input
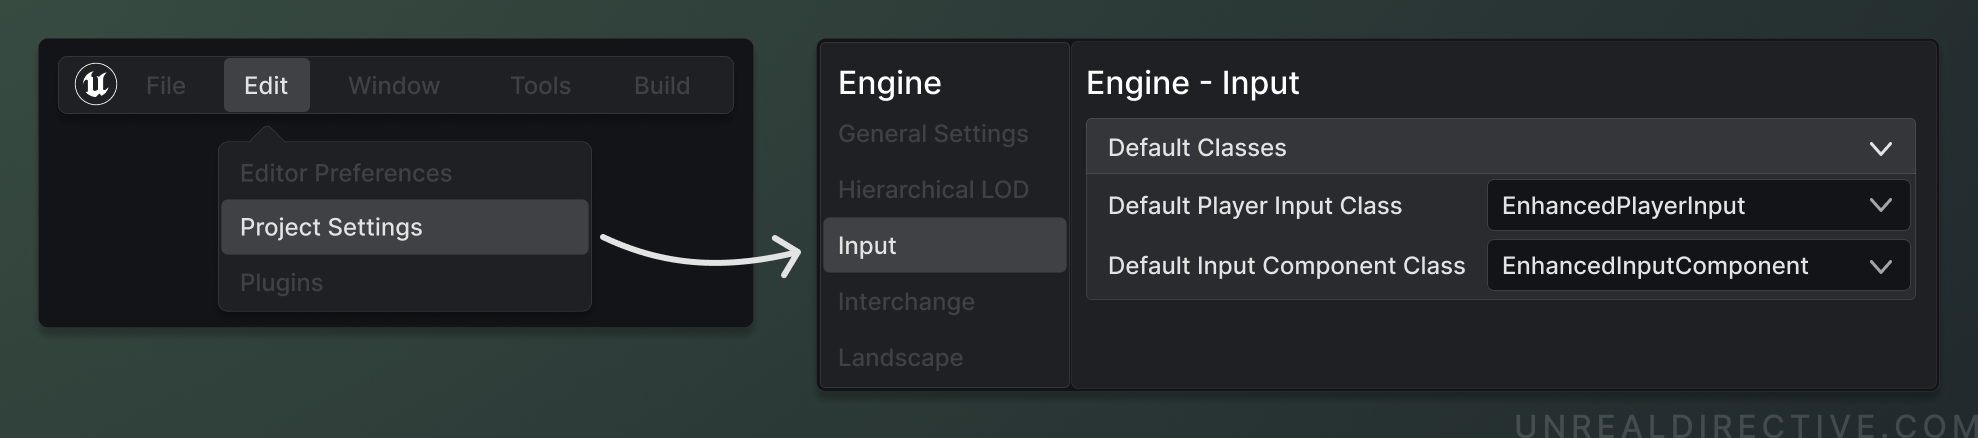
There are two project settings that need to be setup to use Enhanced Input.
Change the Default Player Input Class property from PlayerInput to EnhancedPlayerInput. And change Default Input Component Class from InputComponent to EnhancedInputComponent.
These two settings can be found within the Project Settings → Engine → Input → Default Classes section.
How do I create Enhanced Input objects in-editor?
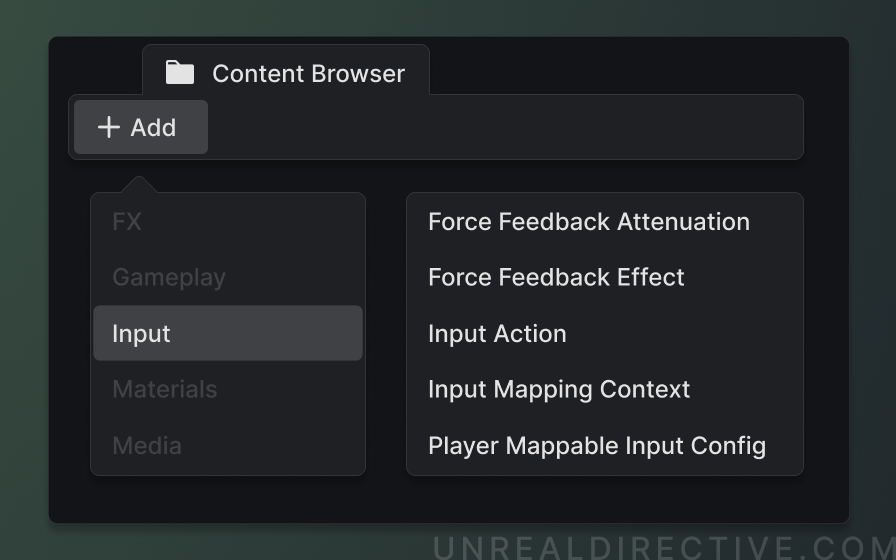
Most of the Enhanced Input assets can be found within the Content Browser → Context Menu → Inputs section.
What is the basic workflow for Enhanced Input?
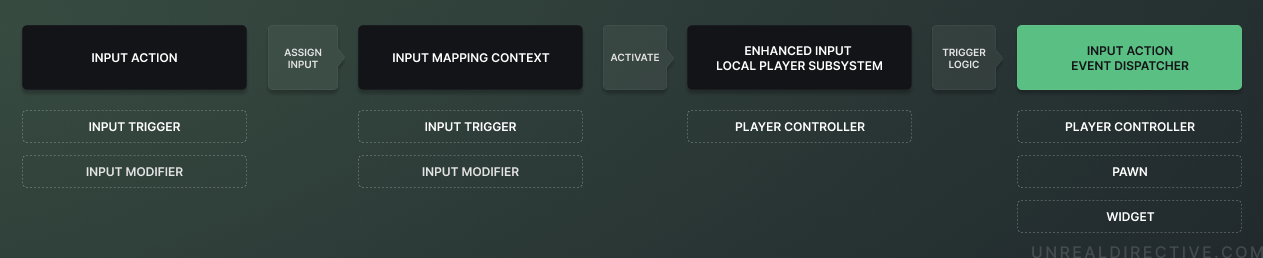
The basic workflow for Enhanced Input is quite simple ---
- Create an Input Mapping Context
- Create an Input Action (e.g., Move, Jump, Attack)
- Assign an Input Trigger to the Input Action (e.g., Released)
- Add the Input Action to the Input Mapping Context and assign it inputs (e.g., WASD)
- Add the Input Mapping Context to the Enhanced Input Local Player Subsystem
- Add the specified Input Action’s Event Dispatcher to a player controlled blueprint (e.g., Pawn)
- Attach logic to the Input Action Event Dispatcher
The subsequent diagram offers a visual representation of the overall system flow within the Enhanced Input framework —
The anatomy of Enhanced Input
This section covers each of the major components of the Enhanced System in detail.
Project Settings
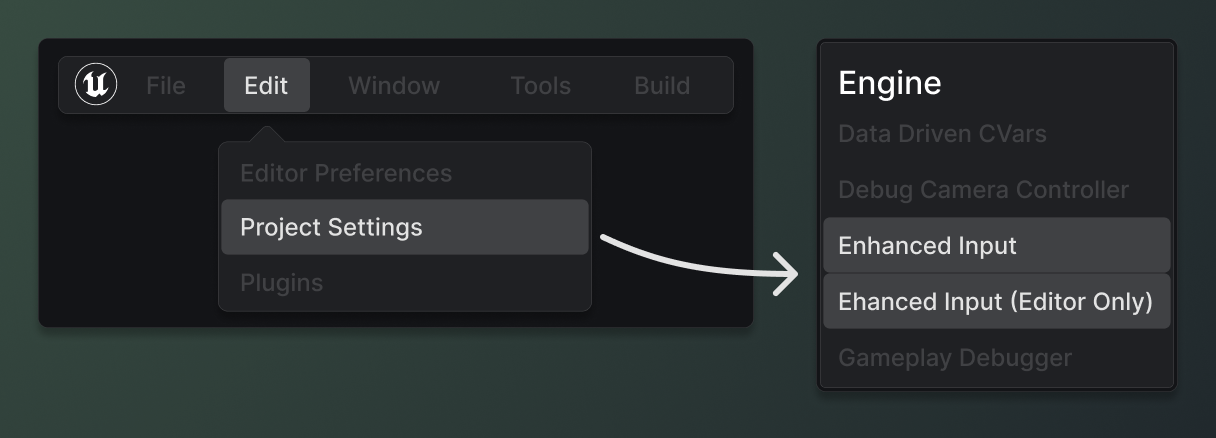
The default values for Enhanced Input can be configured within the Project Settings. These settings can be found under Project Settings → Engine → Enhanced Input.
Default Mapping Contexts
Allows you to establish default Input Mapping Contexts that should be applied by default.
Enable Default Mapping Contexts
Allows you to enable or disable the established default Input Mapping Contexts from the Default Mapping Contexts property.
Platform Settings
Allows for the application of default Input Data --- an object that holds variable data. Currently, the Input Data object stores a single variable known as Mapping Context Redirectors. As indicated by its name, it offers the flexibility to map one Input Mapping Context onto another.
The available platforms of configuration are —
- Android
- HoloLens
- IOS
- Linux
- LinuxArm64
- Mac
- TVOS
- Windows
Should Only Trigger Last Action in Chord
This property ensures that the last action in a ChordedAction trigger will be fired. Essentially, this means that only the last action, and not the individuals steps, will be triggered.
This option is enabled by default. Disable it if you wish to have a ChordedAction trigger fire for all of it’s steps.
Dead Zone
Establishes the default dead zone for the project.
| Property | Description |
|---|---|
| Lower Threshold | Any values below the set value will be ignored. |
| Upper Threshold | Any value above the set value will be ignored. |
| Type | Set wither the dead zone logic should be allied to all axes simultaneously, or individually. |
Response Curve
Establishes the default exponential response curve for the project.
| Property | Description |
|---|---|
| Curve Exponent | The default exponential curve (per axis) used for Input Actions. |
FOV Scaling
Establish the default scaling on how much the inputs should be scaled by the field of view.
| Property | Description |
|---|---|
| FOVScale | Applies a multiplier to the default FOV scaling. This should stay at the default 1.0 value unless required. |
| FOVScaling Type | The default scaling type – between the current UE5 standard or the old UE4 standard for backwards compatibility. This property shouldn’t need to be changed unless you’ve upgraded your project from UE4 and require the older FOV scaling method. |
Trigger Default Values
Allows the adjustment of the default values for all trigger types – engine and custom.
Input Triggers
Input Triggers are a set of requirements that need to be met before the Input Action can trigger.
Default triggers
Enhanced Input comes with multiple default triggers that will cover the majority of use cases —
| Property | Description |
|---|---|
| Chorded Action | Require the Input Action to only trigger if one or multiple other Input Actions have been triggered. |
| Combo | Require the Input Action to only trigger if the set combination of Input Actions have been triggered within the set timeframe. |
| Down | Require the Input Action to only trigger if the input has been pressed down by a certain threshold. |
| Hold | Require the Input Action to only trigger if the input has been held for a set amount of time. |
| Hold And Release | Require the Input Action to only trigger if the input has been held for a set amount of time and then released. |
| Pressed | Require the Input Action to only trigger once if the input has been pressed down by a certain threshold. |
| Pulse | Require the Input Action to trigger at set intervals (in seconds) once activated. |
| Released | Require the Input Action to only trigger once if the input has been released by a certain threshold. |
| Tap | Require the Input Action to trigger if the input is activated and deactivated within a set interval. |
Creating a custom Enhanced Input Trigger
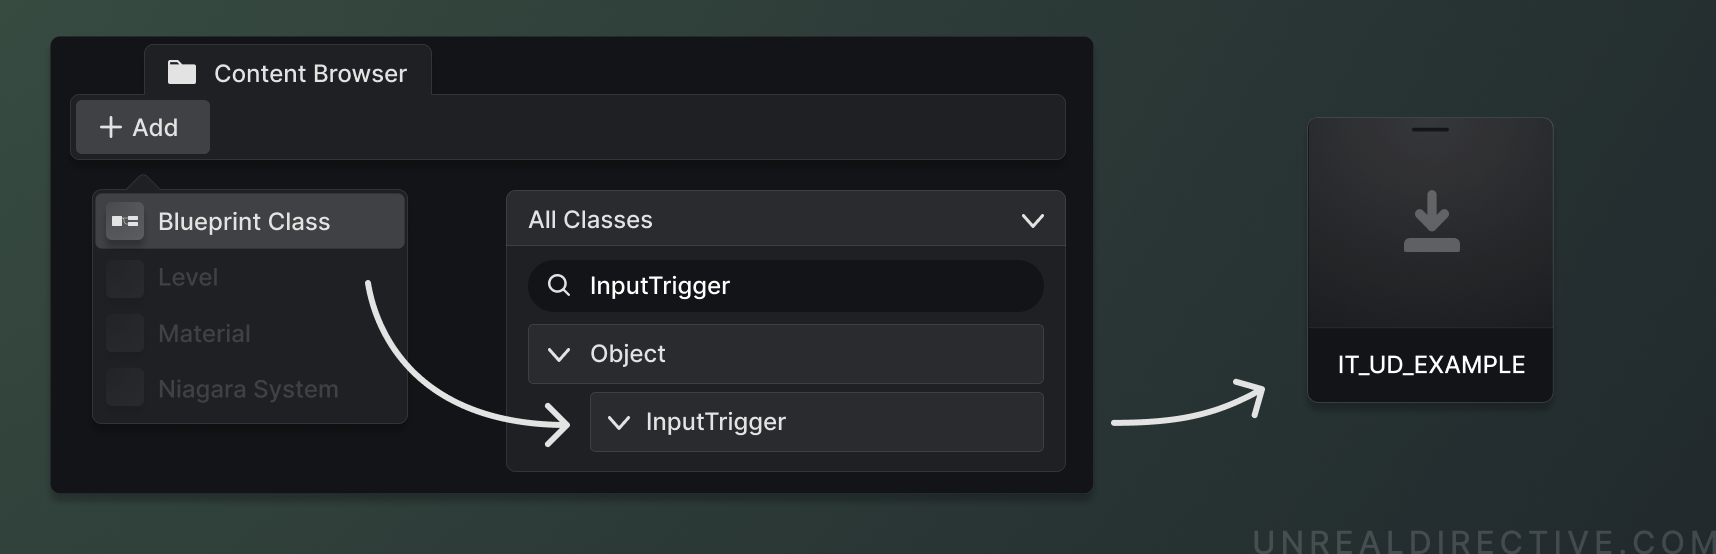
Custom triggers can be created in C++ or Blueprints by subclassing the UInputTrigger class and overriding the GetTriggerType and UpdateState functions.
#pragma once

#include "CoreMinimal.h"
#include "InputTriggers.h"
#include "UDInputTriggerExample.generated.h"

/**
 * UUDInputTriggerExample
 *
 * A basic example of how to create a custom Input Trigger.
 */
UCLASS()
class UDENHANCEDINPUTRUNTIME_API UUDInputTriggerExample : public UInputTrigger
{
	GENERATED_BODY()

	virtual ETriggerType GetTriggerType_Implementation() const override;
	virtual ETriggerState UpdateState_Implementation(const UEnhancedPlayerInput* PlayerInput, FInputActionValue ModifiedValue, float DeltaTime) override;
};
#include "Framework/Input/Triggers/UDInputTriggerExample.h"

ETriggerType UUDInputTriggerExample::GetTriggerType_Implementation() const
{
	// Add your custom logic here.
	return Super::GetTriggerType_Implementation();
}

ETriggerState UUDInputTriggerExample::UpdateState_Implementation(const UEnhancedPlayerInput* PlayerInput, const FInputActionValue ModifiedValue, const float DeltaTime)
{
	// Add your custom logic here.
	return Super::UpdateState_Implementation(PlayerInput, ModifiedValue, DeltaTime);
}
Input Modifiers
Input Modifiers alter the value of an Input Action. The specific way in which they modify the value depends on the type of modifier and the order in which they appear in the array.
Default Modifiers
Enhanced Input comes with multiple default modifiers that will cover the majority of use cases —
Creating a custom Enhanced Input Modifiers
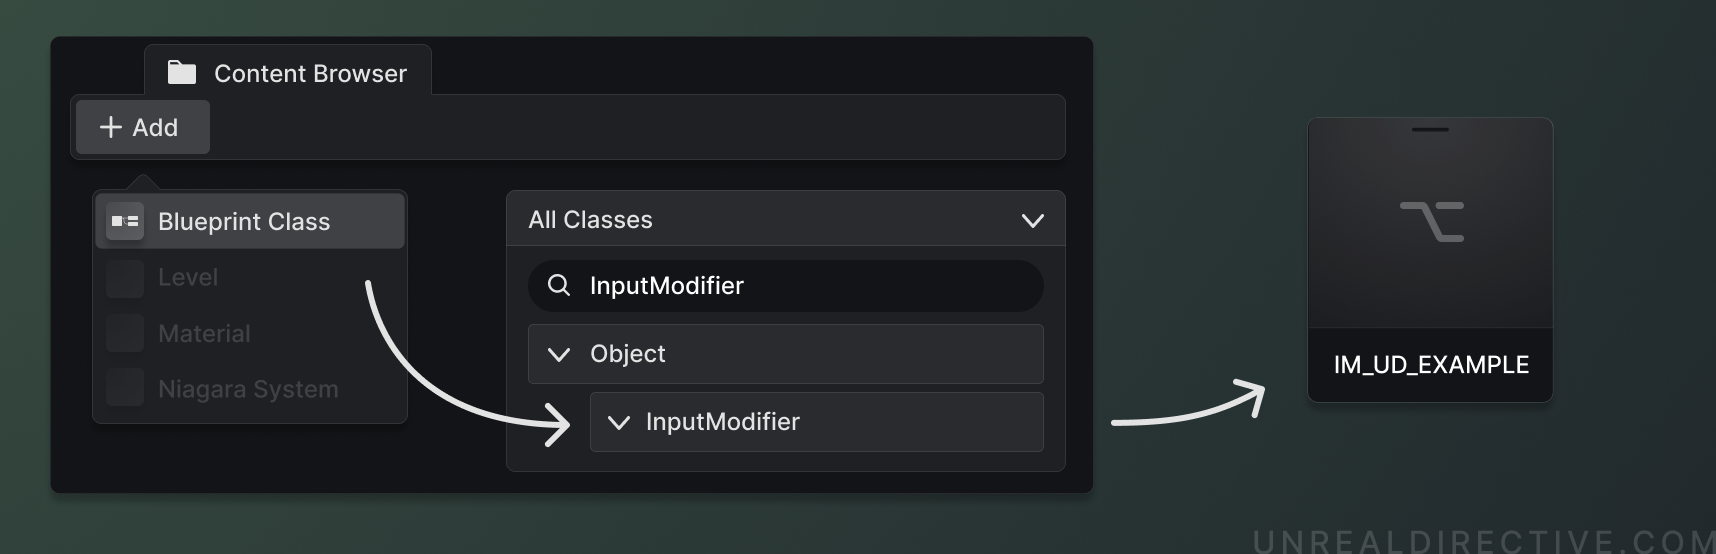
Additional modifiers can be manually created in C++ or Blueprints by creating a UInputModifier subclass and overriding the ModifyRaw function.
#pragma once

#include "CoreMinimal.h"
#include "InputModifiers.h"
#include "UDInputModifierExample.generated.h"

/**
 * UUDInputModifierExample
 *
 * A basic example of how to create a custom Input Modifier.
 */
UCLASS()
class UDENHANCEDINPUTRUNTIME_API UUDInputModifierExample : public UInputModifier
{
	GENERATED_BODY()

	virtual FInputActionValue ModifyRaw_Implementation(const UEnhancedPlayerInput* PlayerInput, FInputActionValue CurrentValue, float DeltaTime) override;
};
#include "Framework/Input/Modifiers/UDInputModifierExample.h"

FInputActionValue UUDInputModifierExample::ModifyRaw_Implementation(const UEnhancedPlayerInput* PlayerInput, const FInputActionValue CurrentValue, const float DeltaTime)
{
	// Add your custom logic here.
	return Super::ModifyRaw_Implementation(PlayerInput, CurrentValue, DeltaTime);
}
Input Action
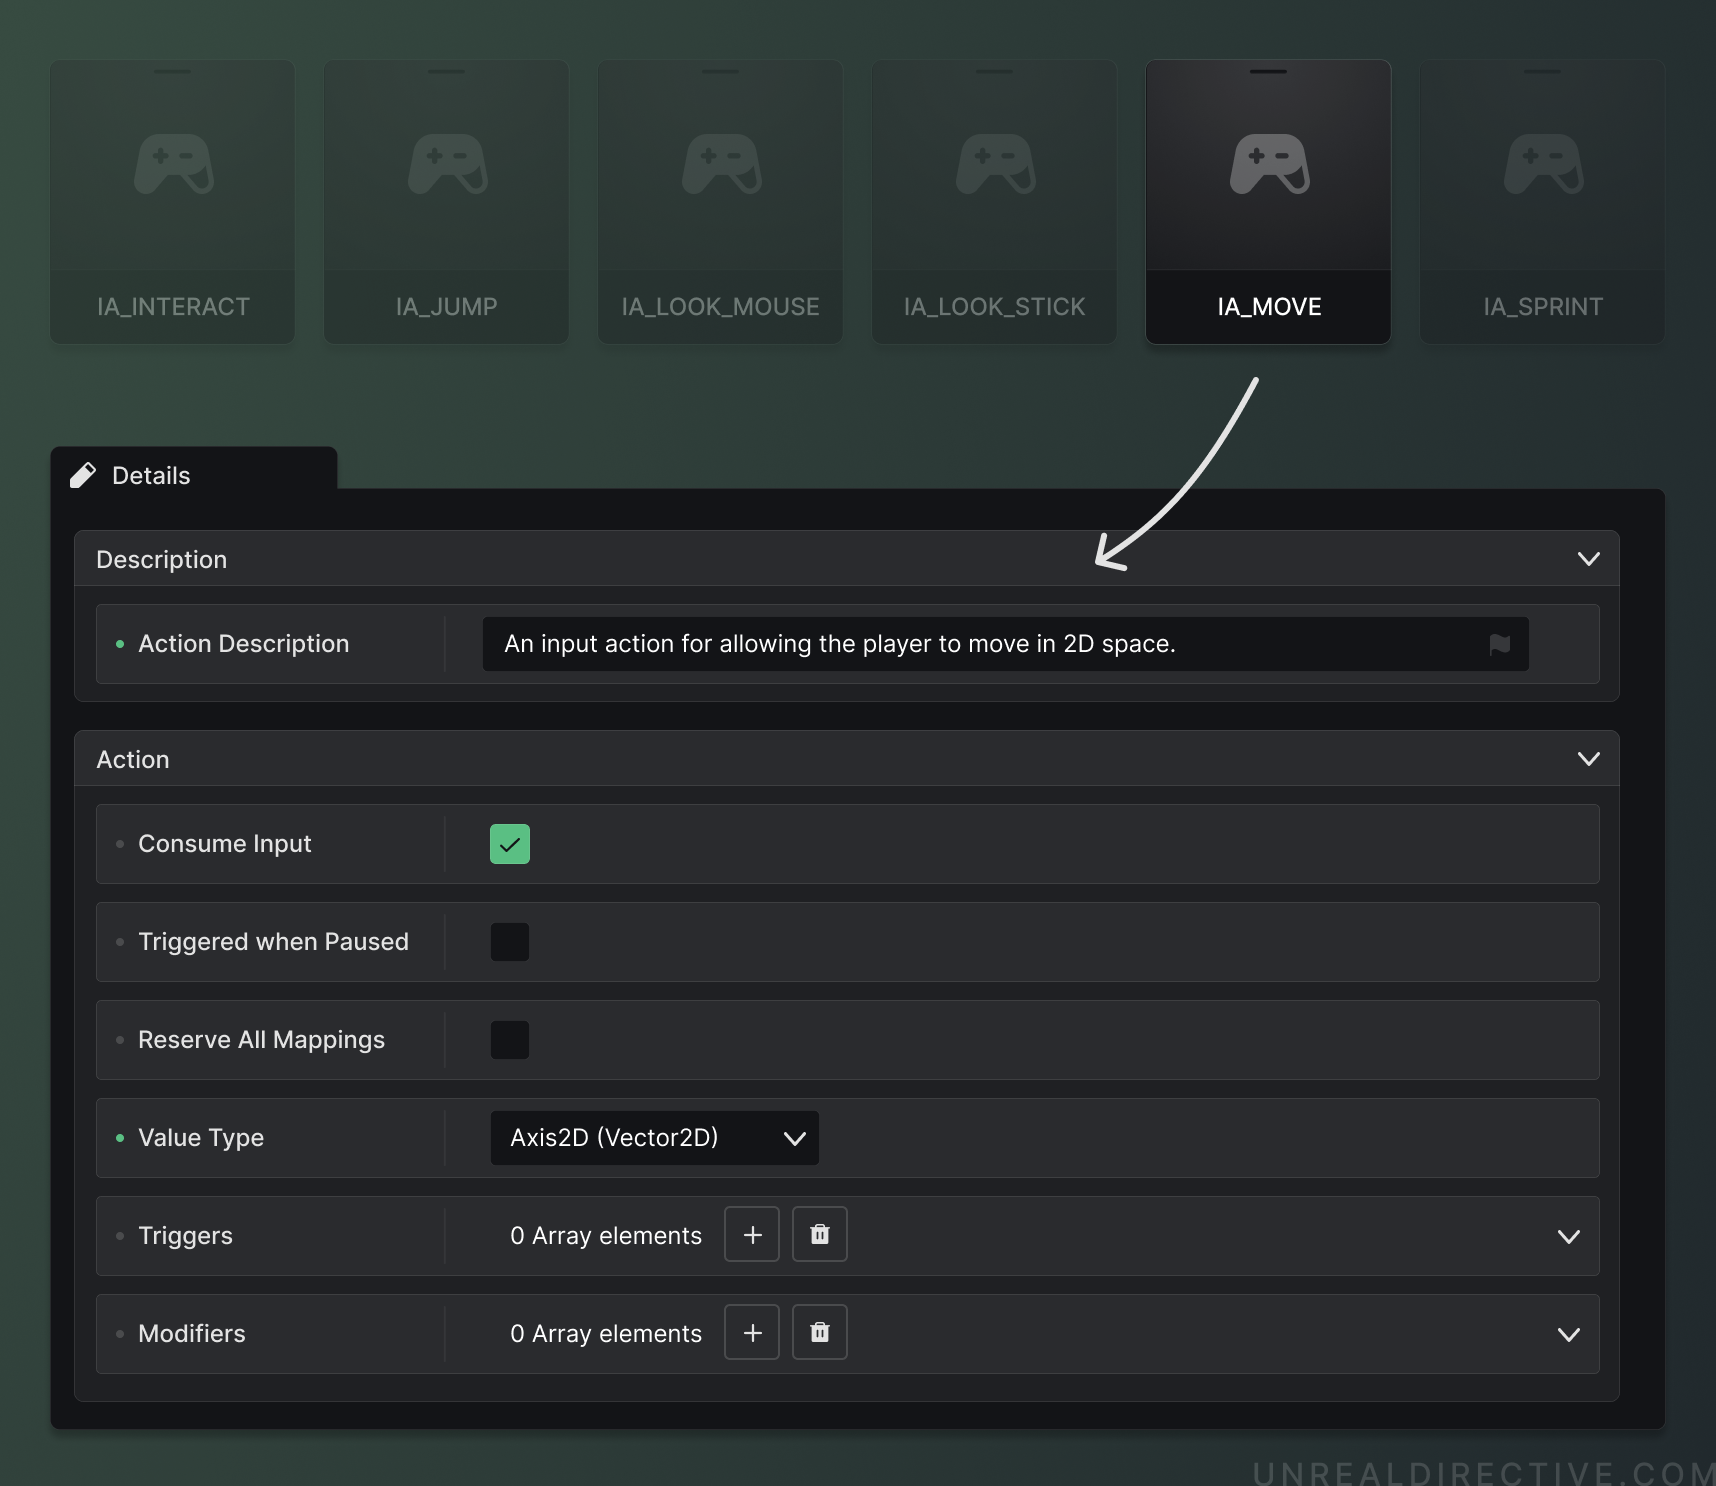
Input Actions are configurable action-orientated Data Assets with registerable listen events and values.
Properties
The Input Action has multiple configurable properties ---
Action Description
Used to describe the purpose of the Input Action. It’s recommended to always fill this out as it helps future you and co-developers on what the Input Action is for. In addition, this can be accessed and used to display the description of the action to players.
Consume Input
When enabled, this Input Action will consume the triggered input, stopping lower priority Input Actions from activating.
Trigger when Paused
When enabled, this Input Action will trigger when the game is in a pause state. (e.g. Main Menu)
Reserve All Mappings
When enabled, this Input Action will not be overridden by higher priority Input Actions.
Value Type
The value to map to the Input Action. Currently, there are 4 different types to choose from ---
| Type | Description | Example |
|---|---|---|
| Digital (bool) | Ideal for button press/release actions. | Jump, Sprint, Interact |
| Axis1D (float) | Ideal for mouse scrolling or button pressure actions. | UI Scrolling |
| Axis2D (Vector2D) | Ideal for WASD, mouse movement, or gamepad thumbstick actions. | Character Movement, Camera Look |
| Axis3D (Vector) | Ideal for complex movement actions such as VR motion controllers. | VR Gestures |
Triggers
Check out the Input Triggers section for more details about this property.
Modifiers
Check out the Input Modifiers section for more details about this property.
Event Listener
When an Input Action Data Asset is created, a coinciding event listener will also be created. This event can be added to almost any blueprint or widget.
Currently, each event has the following outputs —
| Option | Description |
|---|---|
| Triggered | Executed when all trigger requirements have been met. |
| Started | Executed when the Input Action has been initially activated. |
| Ongoing | Executed when the trigger requirements are still being evaluated. |
| Canceled | Executed if the Input Action has been canceled. |
| Completed | Executed when triggering has finished. |
| Action Value | The Input Actions value. |
| Elapsed Seconds | How many seconds it’s been since the Input Action has been active. |
| Triggered Seconds | How many seconds it’s been since the Input Action has been successfully triggered. |
| Input Action | A reference to the Input Action itself. Useful for retrieving relevant information about the action. |
Creating an Enhanced Input Action
An Input Action object can be manually created in C++ or Blueprints by creating a UInputAction subclass.
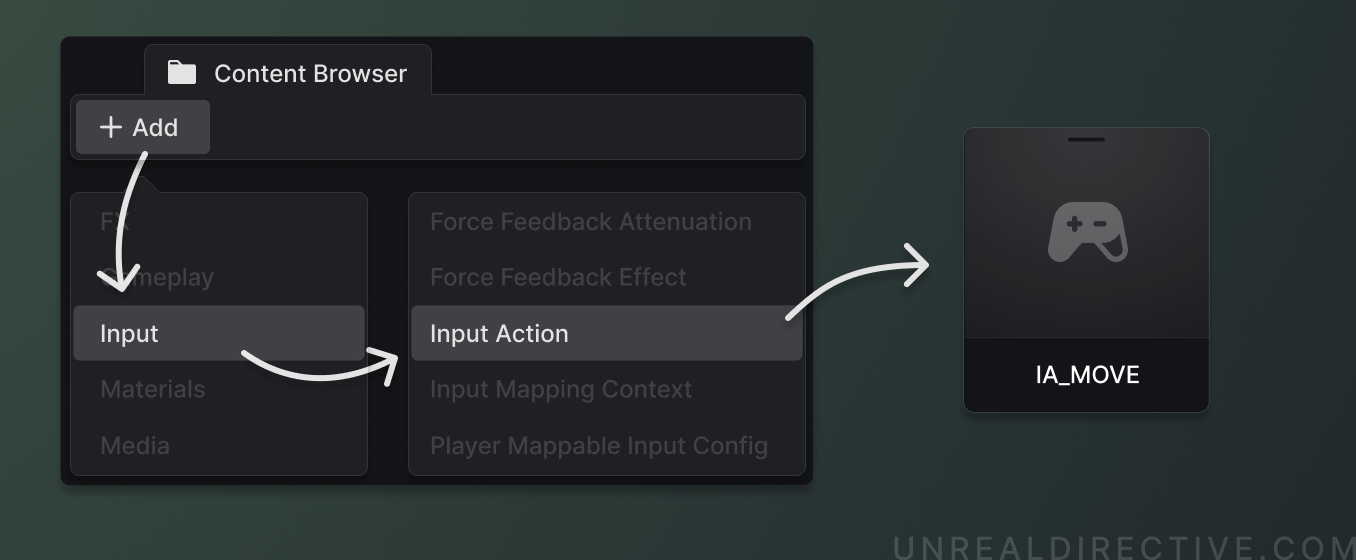
Input Mapping Context
Input Mapping Contexts are Data Assets that define which input keys trigger certain Input Actions.
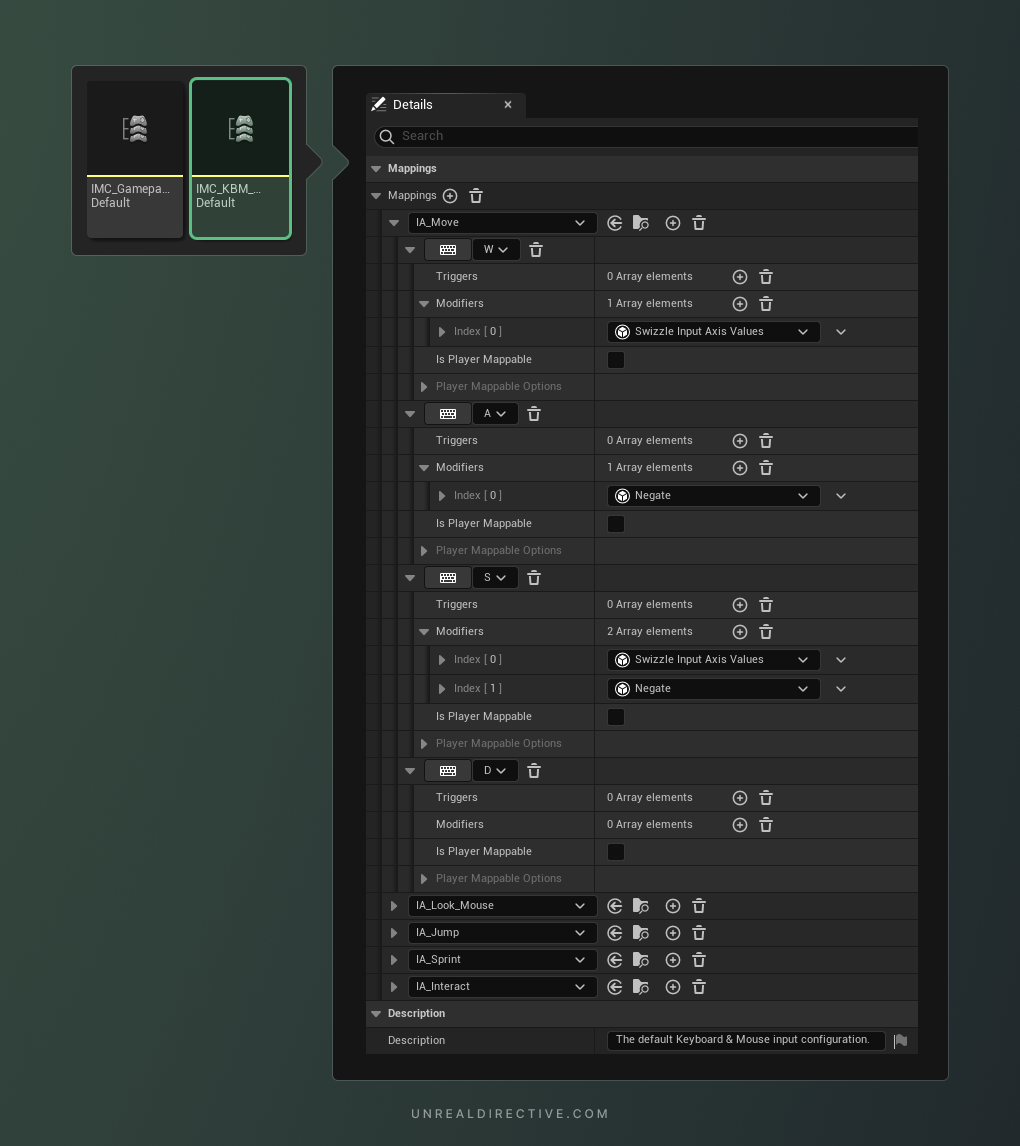
Mappings
In the Mappings array of an Input Mapping Context, you can specify the Input Actions that you want to include. For each Input Action, you will need to assign at least one input key.
You can also add multiple input keys for each action and configure options such as triggers, modifiers, and whether the key is able to be remapped by the player.
Input Properties
As stated, each input contains multiple different properties.
| Option | Description |
|---|---|
| Input Key | Assign the key for the Input Action. You can either select from the dropdown or click the keyboard button and press the desired key. |
| Triggers | Check out the Input Triggers section for more details about this property. In addition to what you would find there, triggers added by the IMC are appended after the Input Action’s set triggers. |
| Modifiers | Check out the Input Modifiers section for more details about this property. In addition to what you would find there, modifiers added by the IMC are appended after the Input Action’s set modifiers. |
| Is Player Mappable | The Is Player Mappable property allows you to set if the input key is remappable by the player or not. When enabled, the Player Mappable Options will be available for configuration. |
| Player Mappable Options | The Player Mappable Options allow you to configure how the key is player configurable. |
| Metadata | The Player Mappable Options - Metadata property allows you to save any additional metadata. |
| Name | The Player Mappable Options - Name property is a unique name that is used to save and identify the player binding. |
| Display Name | The Player Mappable Options - Display Name property is used to display the name of the binding to the player. |
| Display Category | The Player Mappable Options - Display Category property is used to display the remappable binding in a specific category. |
Player Mappable Input Config
Player Mappable Input Configs are Data Assets that establish preset input configurations.
Properties
Each of the Player Mappable Input Config assets contain multiple different properties, let me break those down for you —
| Option | Description |
|---|---|
| Config Name | The Config Name property is a unique name used to save and identify the Player Mappable Input Config. Make sure to not name other PMIC’s with the same config name as this can cause identification issues. |
| Config Display Name | The Config Display Name property is the name that should be used when needing to display the preset. |
| Is Deprecated | The Is Deprecated property is a flag used to mark the Player Mappable Input Config as deprecated to the player or co-developers. |
| Metadata | The Metadata property is used to hold any form of metadata; wither that be icons, ability assets, etc. |
| Contexts | The Context array holds all of the Input Mapping Contexts that should go along with the preset. |
Force Feedback Attenuation
Force Feedback Attenuations are Data Assets that control the intensity of haptic feedback on controllers or devices.
Properties
Each of the Force Feedback Attenuation assets contains multiple different properties, let me break those down for you —
Attenuation Function
The Attenuation Function property sets the mathematical function used to calculate the intensity of the haptic feedback based on the distance from the source.
There are five options —
| Option | Description |
|---|---|
| Linear | With the linear attenuation function, the haptic feedback would decrease at a constant rate. This would option be ideal when needing to feel different levels of resistance based on the object’s material (e.g., wood vs metal). |
| Logarithmic | With the logarithmic attenuation function, the haptic feedback would decrease more quickly as the distance from the source increases. |
| Inverse | With the inverse attenuation function, the haptic feedback would decrease more slowly as the distance from the source increases. |
| Log Reverse | With the log reverse attenuation function, the haptic feedback would drop more slowly as the distance from the source increases initially, but more quickly as it increases further. |
| Custom | With a custom attenuation function, you will be able to define your own attenuation logic. |
Attenuation Shape
The Attenuation Shape property sets the shape of the area in which the haptic feedback is applied.
There are four options —
| Option | Description |
|---|---|
| Sphere | With the sphere attenuation shape, the haptic feedback is applied in a spherical area around the source. The intensity of the feedback decreases with distance from the center of the sphere. |
| Capsule | With the capsule attenuation shape, the haptic feedback is applied in a capsule-shaped area around the source. The intensity of the feedback decreases with distance from the center of the capsule. |
| Box | With the box attenuation shape, the haptic feedback is applied in a rectangular box-shaped area around the source. The intensity of the feedback decreases with distance from the center of the box. |
| Cone | With the cone attenuation shape, the haptic feedback is applied in a cone-shaped area around the source. The intensity of the feedback decreases with distance from the center of the cone. |
Different shapes provide different attenuation effects. For example, if you want the haptic feedback effect to be felt in a wide area around the subject, then you would use the sphere or box shapes. However, if you want the feedback to be focused in a direction, then the cone shape would be more applicable.
Inner Radius
Controls the distance from the source at which the haptic feedback effect reaches its maximum intensity.
Falloff Distance
Controls the distance from the source at which the haptic feedback effect reaches zero intensity.
Force Feedback Effect
Force Feedback Effects are Data Assets that establish haptic feedback such as vibrations or other sensations.
Properties
Each of the Force Feedback Effect assets contains multiple different properties, let me break those down for you —
| Option | Description |
|---|---|
| Channel Details | An array that holds the properties that specify the details of the haptic feedback effect. |
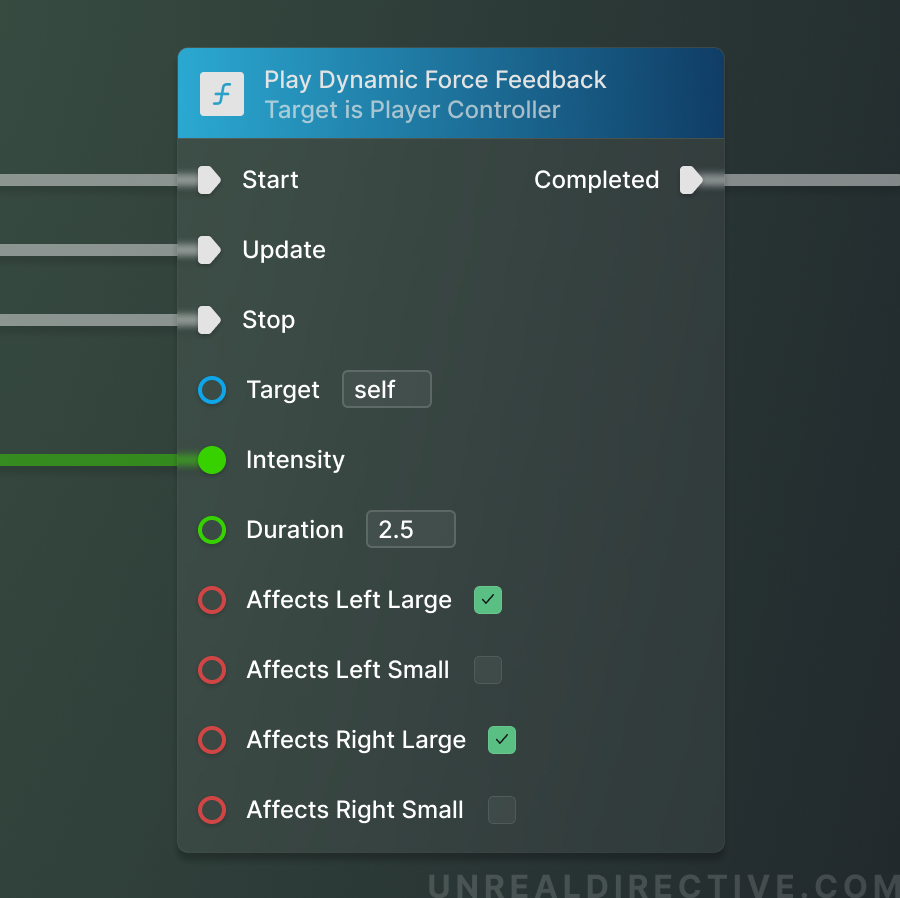
| Affects Left Large | Enable to produce a large sensation on the left side of the controller. |
| Affects Left Small | Enable to produce a small sensation on the left side of the controller. |
| Affect Right Large | Enable to produce a large sensation on the right side of the controller. |
| Affect Right Small | Enable to produce a small sensation on the right side of the controller. |
| Curve | Adjust the curve to control the intensity, duration, and feel of the haptics. |
| Duration | Displays the duration of the force feedback effect based on what is setup in the Channel Details curve properties. The duration property itself is non-configurable. |
Play Dynamic Force Feedback
You can utilize the Play Dynamic Force Feedback function to dynamically apply force feedback without using a Force Feedback Effect Data Asset.
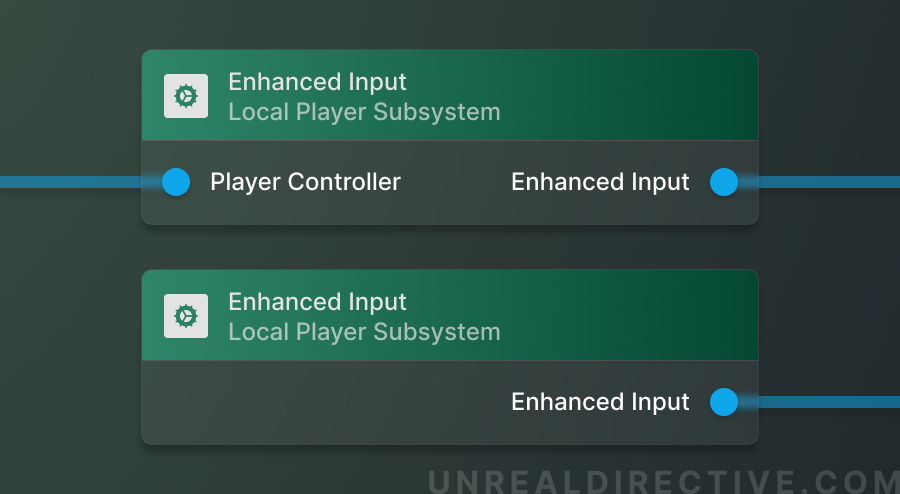
Enhanced Input Local Player Subsystem
An engine subsystem that controls which Input Mapping Contexts are active, inject simulated Input Actions, and more.
Example Function
/**
* Apply multiple Input Mapping Contexts.
* @param Contexts The contexts to apply.
* @param bClearPrevious Whether to clear the previous contexts.
*/
UFUNCTION(BlueprintCallable, Category = "Unreal Directive|Input Mapping")
void SetInputMappingContexts(const TArray<UInputMappingContext*>& Contexts, bool bClearPrevious = true);
void AUDPlayerController::SetInputMappingContexts(const TArray<UInputMappingContext*>& Contexts, const bool bClearPrevious)
{
	// Return early if no contexts were given to ensure no errors occur.
	if (Contexts.IsEmpty()) { return; }

	if (const ULocalPlayer* LocalPlayer = Cast<ULocalPlayer>(Player))
	{
  		// Safely retrive the Enhanced Input Local Player Subsystem
		if (UEnhancedInputLocalPlayerSubsystem* EnhancedInput = LocalPlayer->GetSubsystem<UEnhancedInputLocalPlayerSubsystem>())
		{
			if (bClearPrevious)
			{
				EnhancedInput->ClearAllMappings();
			}

			for (const UInputMappingContext* Context : Contexts)
			{
				EnhancedInput->AddMappingContext(Context, 0);
			}
		}
	}
}
Functions
Each of the Enhanced Input Local Player Subsystem functions control different aspects of the Enhanced Input system.
Let me break down some of the main functions for you ---
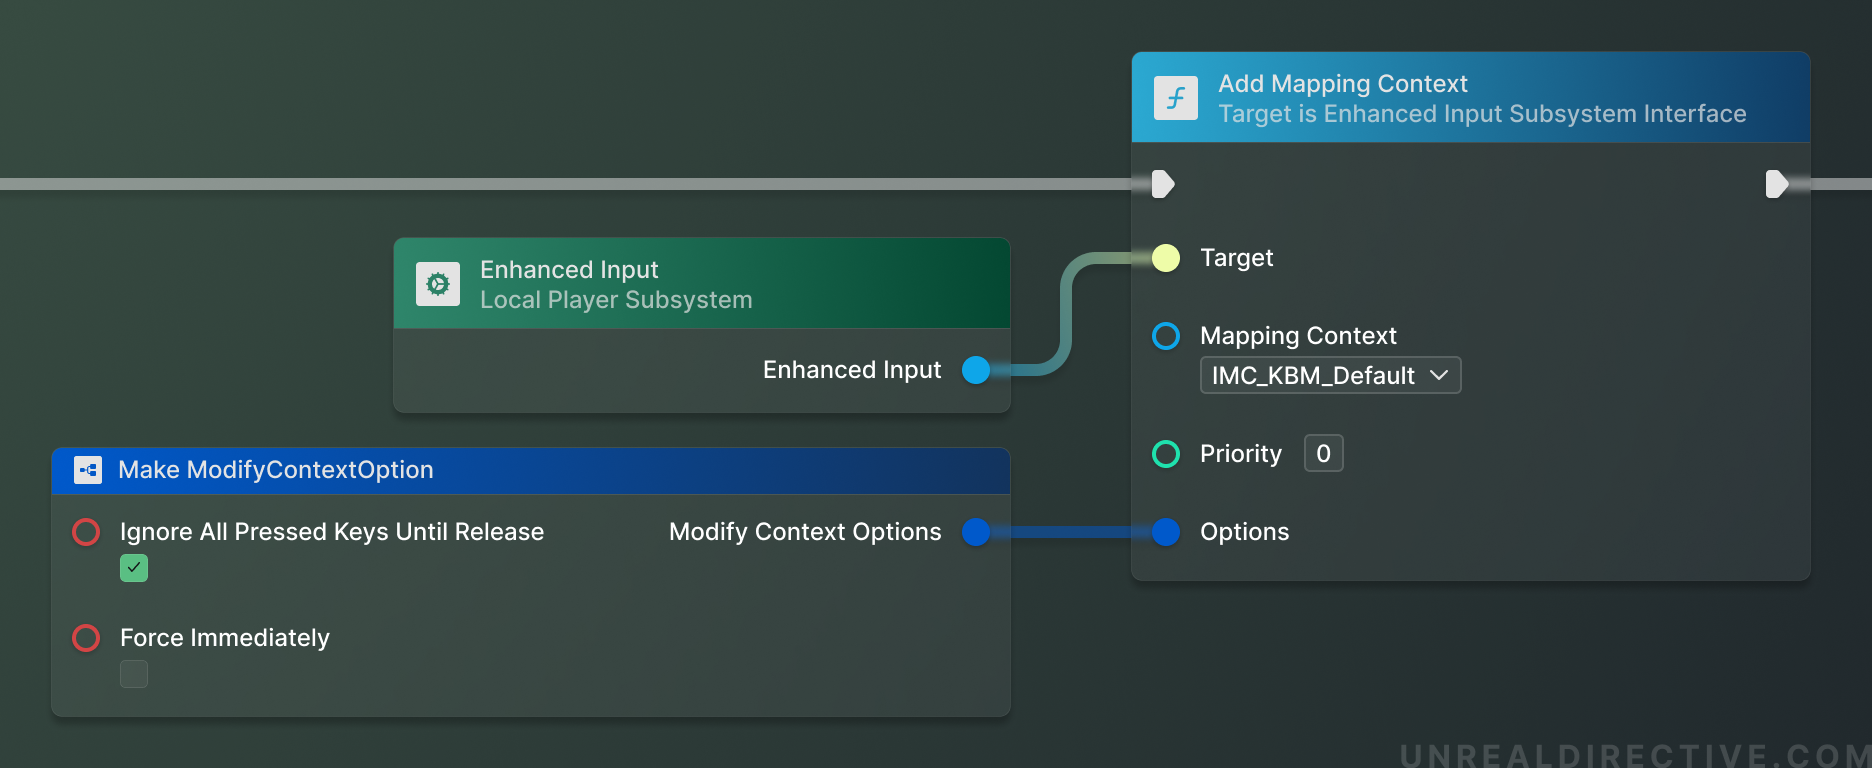
Add Mapping Context
The Add Mapping Context function will add a singular Input Mapping Context and register it with the Enhanced Input Subsystem at a specified priority level. The priority level is especially important here as inputs from a Input Mapping Context will block the inputs from a lower priority Input Mapping Context *if *the input has been specified to consume their input.
When should you use this function?
You would typically use this function to register a specific Input Mapping Context. For example, this would be used to add basic player inputs such as moving and looking around.
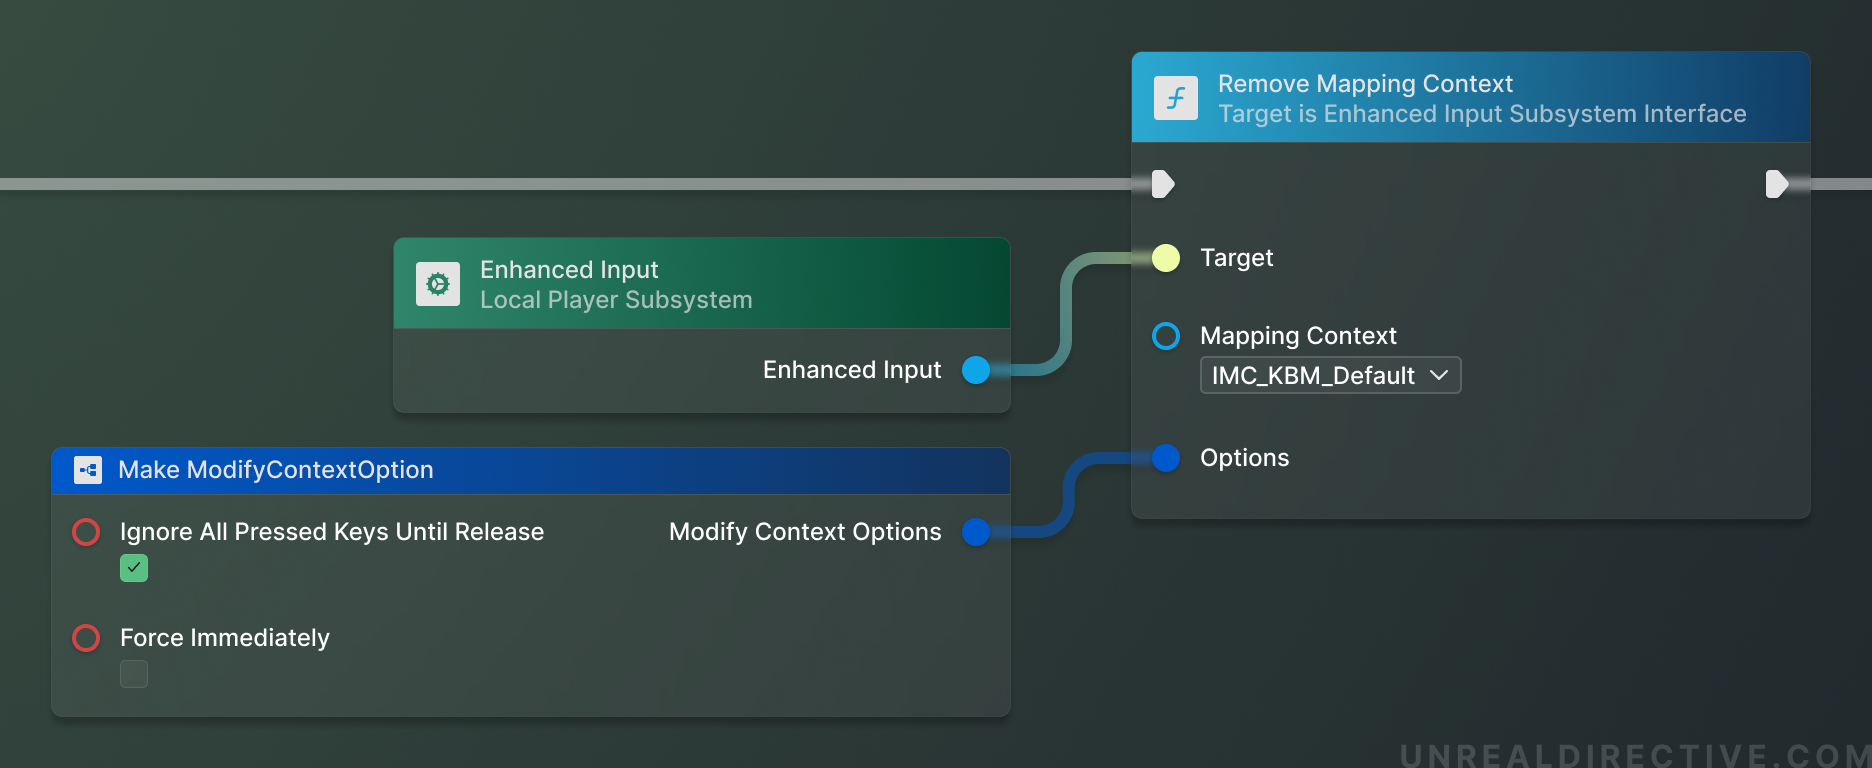
Remove Mapping Context
The Remove Mapping Context function will remove and deactivate a singular Input Mapping Context that has been registered with the players Enhanced Input Subsystem.
When should you use this function?
You would typically use this function to remove a specific Input Mapping Context from play. For example, exiting a vehicle would remove a vehicle-based mapping.
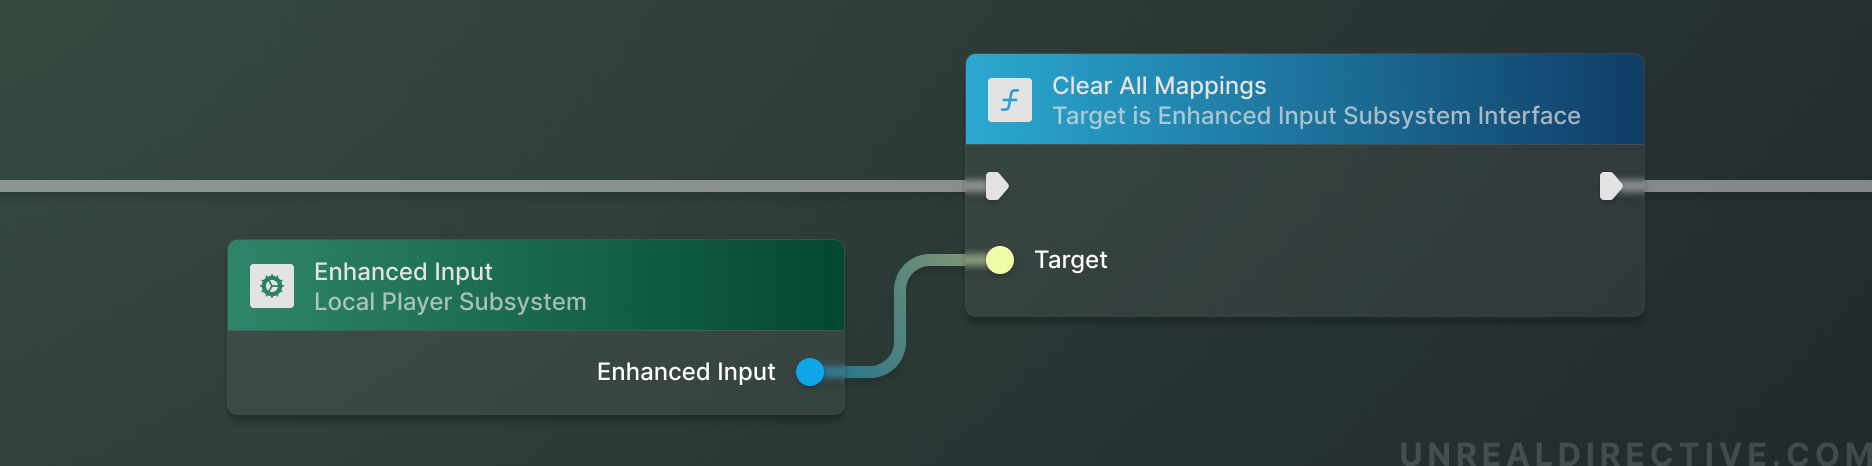
Clear All Mappings
The Clear All Mappings function will remove and deactivate ALL Input Mapping Contexts that have been registered with the players Enhanced Input System.
When should you use this function?
You would use this function to completely reset your players input bindings and start with a clean slate.
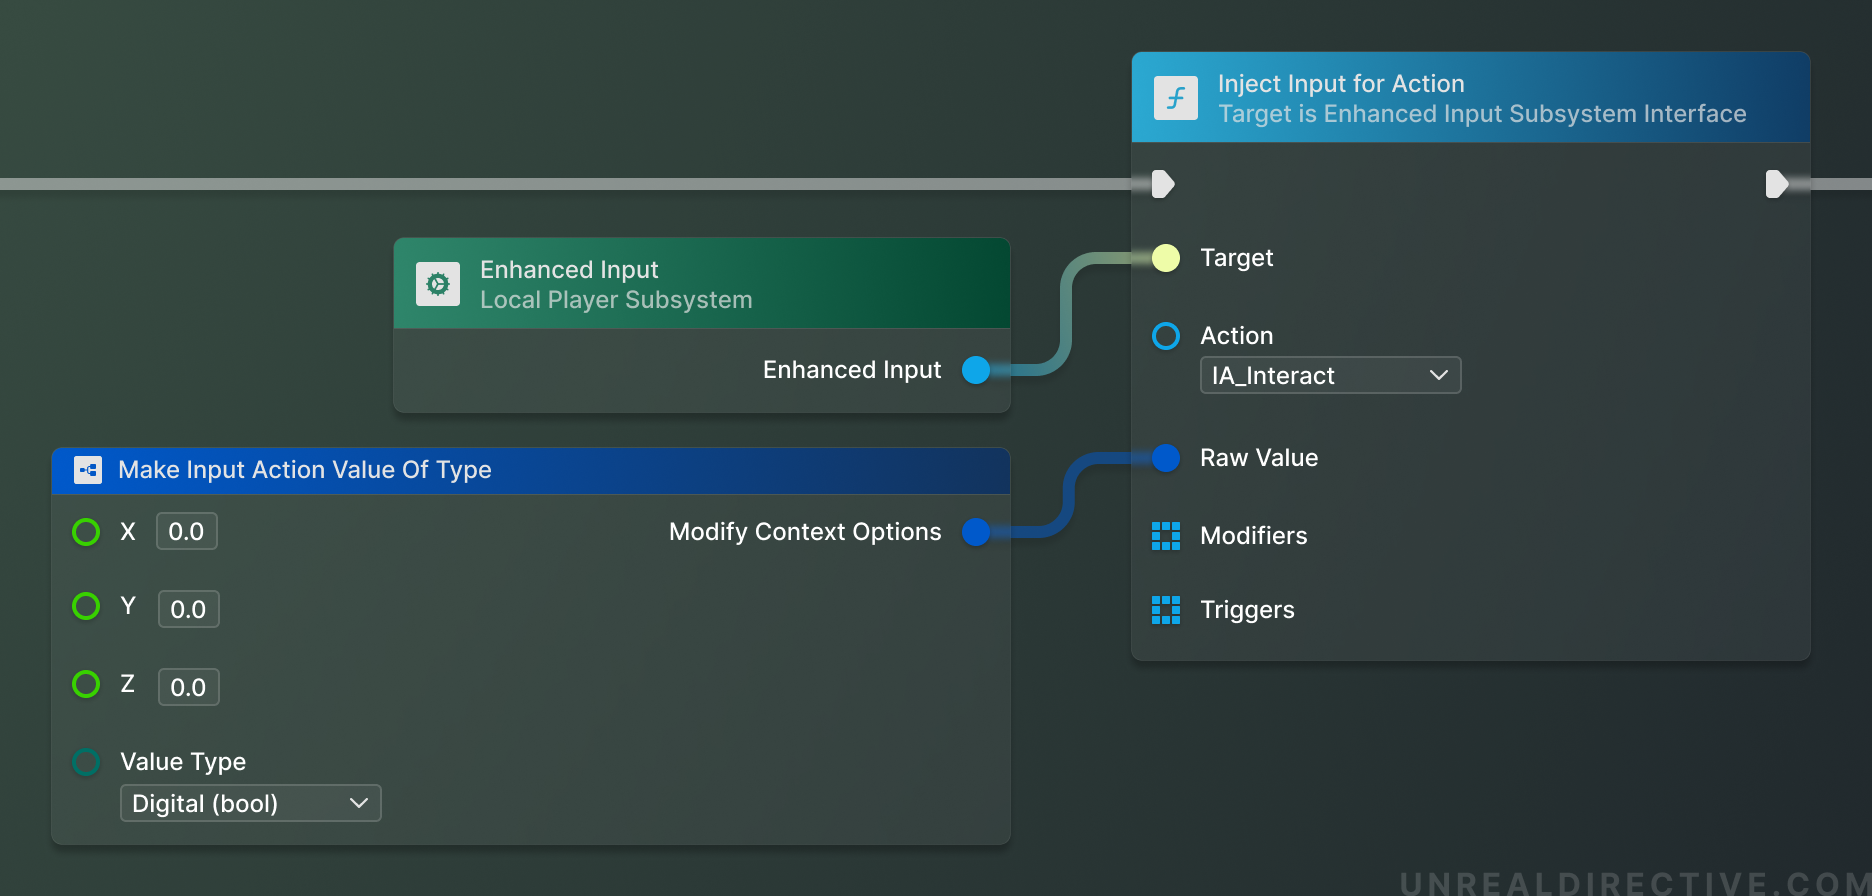
Inject Input for Action
The Inject Input for Action function will allow you to *manually *and programmatically trigger any Input Action with a custom value, modifiers, and triggers.
When should you use this function?
You should use this function when you need to manually activate or test a singular Input Action without requiring an Input Mapping Context or any input from the player.
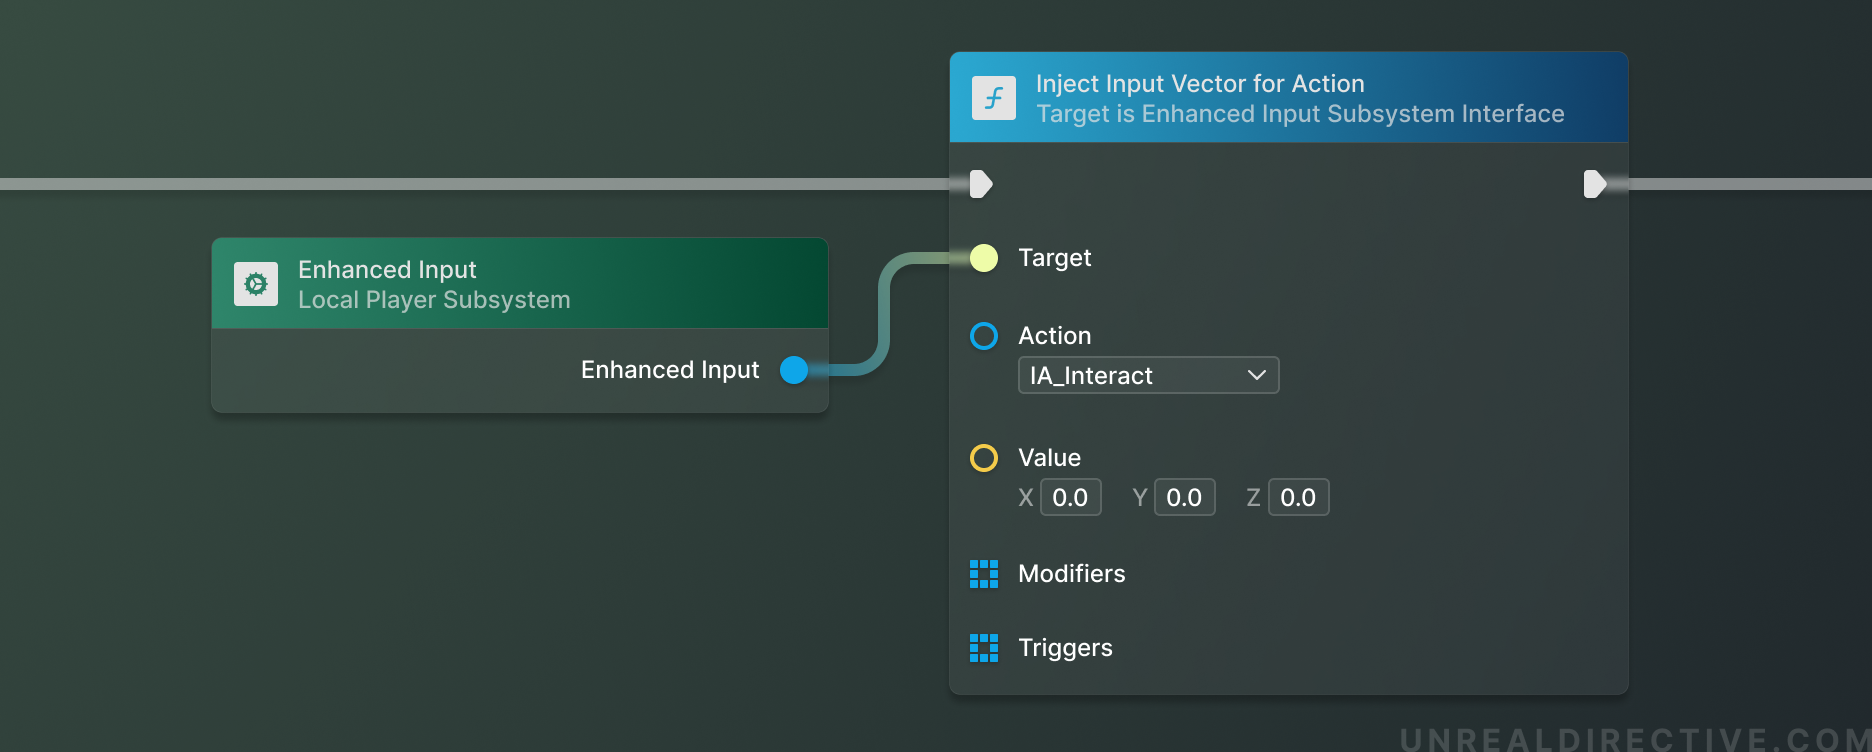
Inject Input Vector for Action
The Inject Input Vector for Action function is essentially the same as the Inject Input for Action function. The primary difference is that the value input is a vector instead of a Raw Input option.
When should you use this function?
You should use this function when you want to trigger specifically an Input Action with a vector value.
Request Rebuild Control Mappings
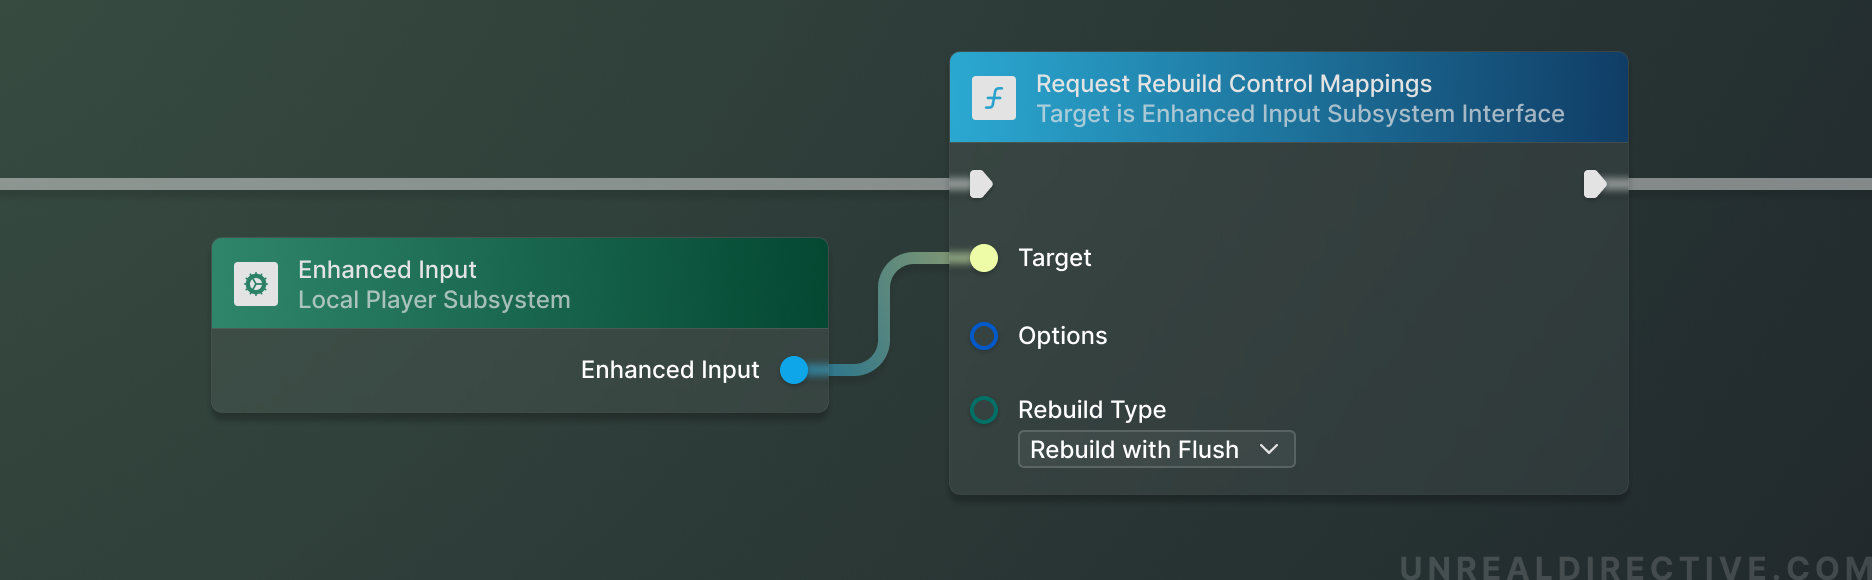
The Request Rebuild Control Mappings function will flag the player for the reapplication of ALL Input Mapping Contexts at the end of the current frame. It is important to note that this function is automatically called whenever an Input Mapping Context is added or removed.
The Rebuild Type enumerator EInputMappingRebuildType designates the desired rebuild method —
- Choose the Rebuild option if no triggers or modifiers have been changed and you wish to just rebuild the mapped Input Actions.
- Choose the Rebuild with Flush option if any triggers or modifiers have been changed with any of the mapped Input Actions. This will reset and rebuild all of their tracked data.
- Choose the None option to… make the function do nothing!
When should you use this function?
You should use this function when you need to manually rebuild the Input Mapping Contexts. That said, this function is called automatically whenever an Input Mapping Context is added or removed. Therefore, you may never need to use this function.
Debugging
There are two primary console commands that are used to debug Enhanced Input ---
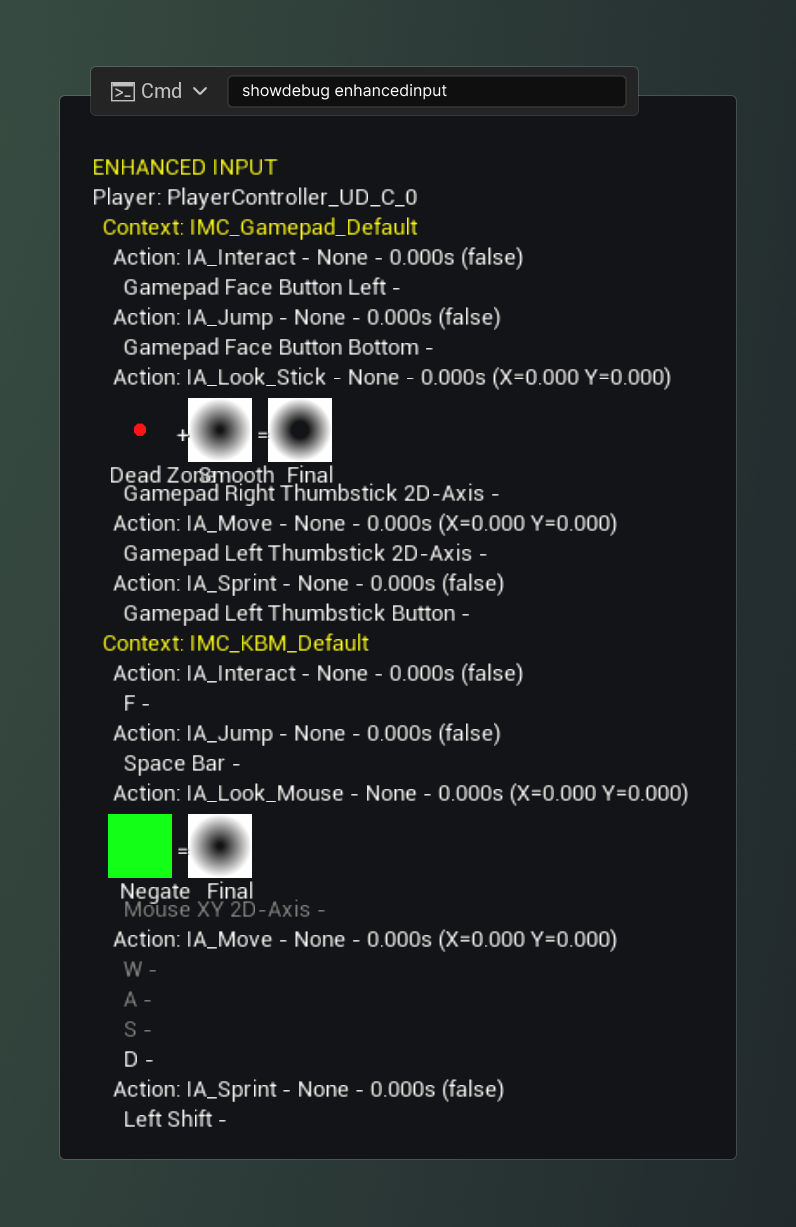
ShowDebug EnhancedInput
The showdebug enhancedinput console command provides helpful information regarding the current state of all of the Input Actions that have been registered by the active Input Mapping Contexts.
This console command should be used when needing to figure out when certain Input Actions are active and to verify their values.
ShowDebug Devices
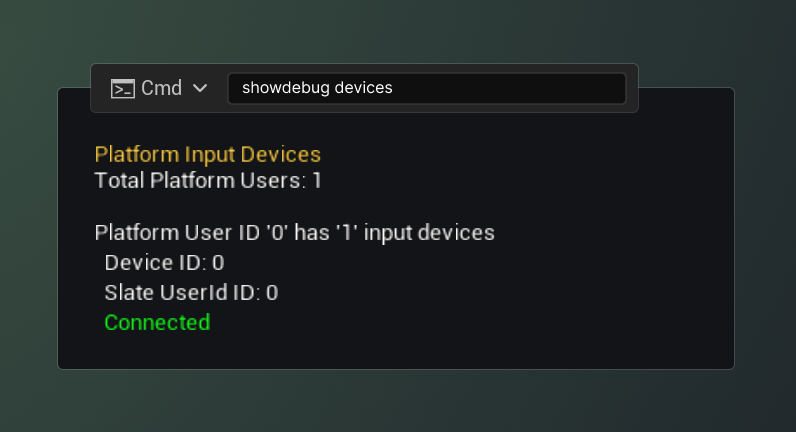
The showdebug devices console command provides helpful information regarding what input devices, such as mouse, keyboard, and gamepads, that are currently connected to the system.
This console command should be used when needing to verify what devices are currently connected to your system.
Best Practices
By implementing these practices, you can maintain a clean and organized project, as well as help yourself and other developers understand the objects within the project and how they are stored.
Naming Conventions
It’s ideal to keep to universal naming conventions to ensure everyone knows what is what.
Here are the naming conventions that I, Epic Games, and the majority of Unreal developer community abide by ---
| Type | Prefix | Example |
|---|---|---|
| Input Action | IA_* | IA_Move, IA_Look_Mouse, IA_Interact |
| Input Mapping Context | IMC_* | IMC_KBM_Default, IMC_Controller_Default |
| Player Mappable Input Config | PMI_* | PMI_VR, PMI_Gamepad |
| Force Feedback Effect | FFE_* | FFE_Melee_Hit, FFE_Explosion |
| Force Feedback Attenuation | FFA_* | |
| Input Modifier | IM_* | |
| Input Trigger | IT_* |
Check out my Asset Naming Conventions resource to explore a more comprehensive list of assets and their naming conventions.
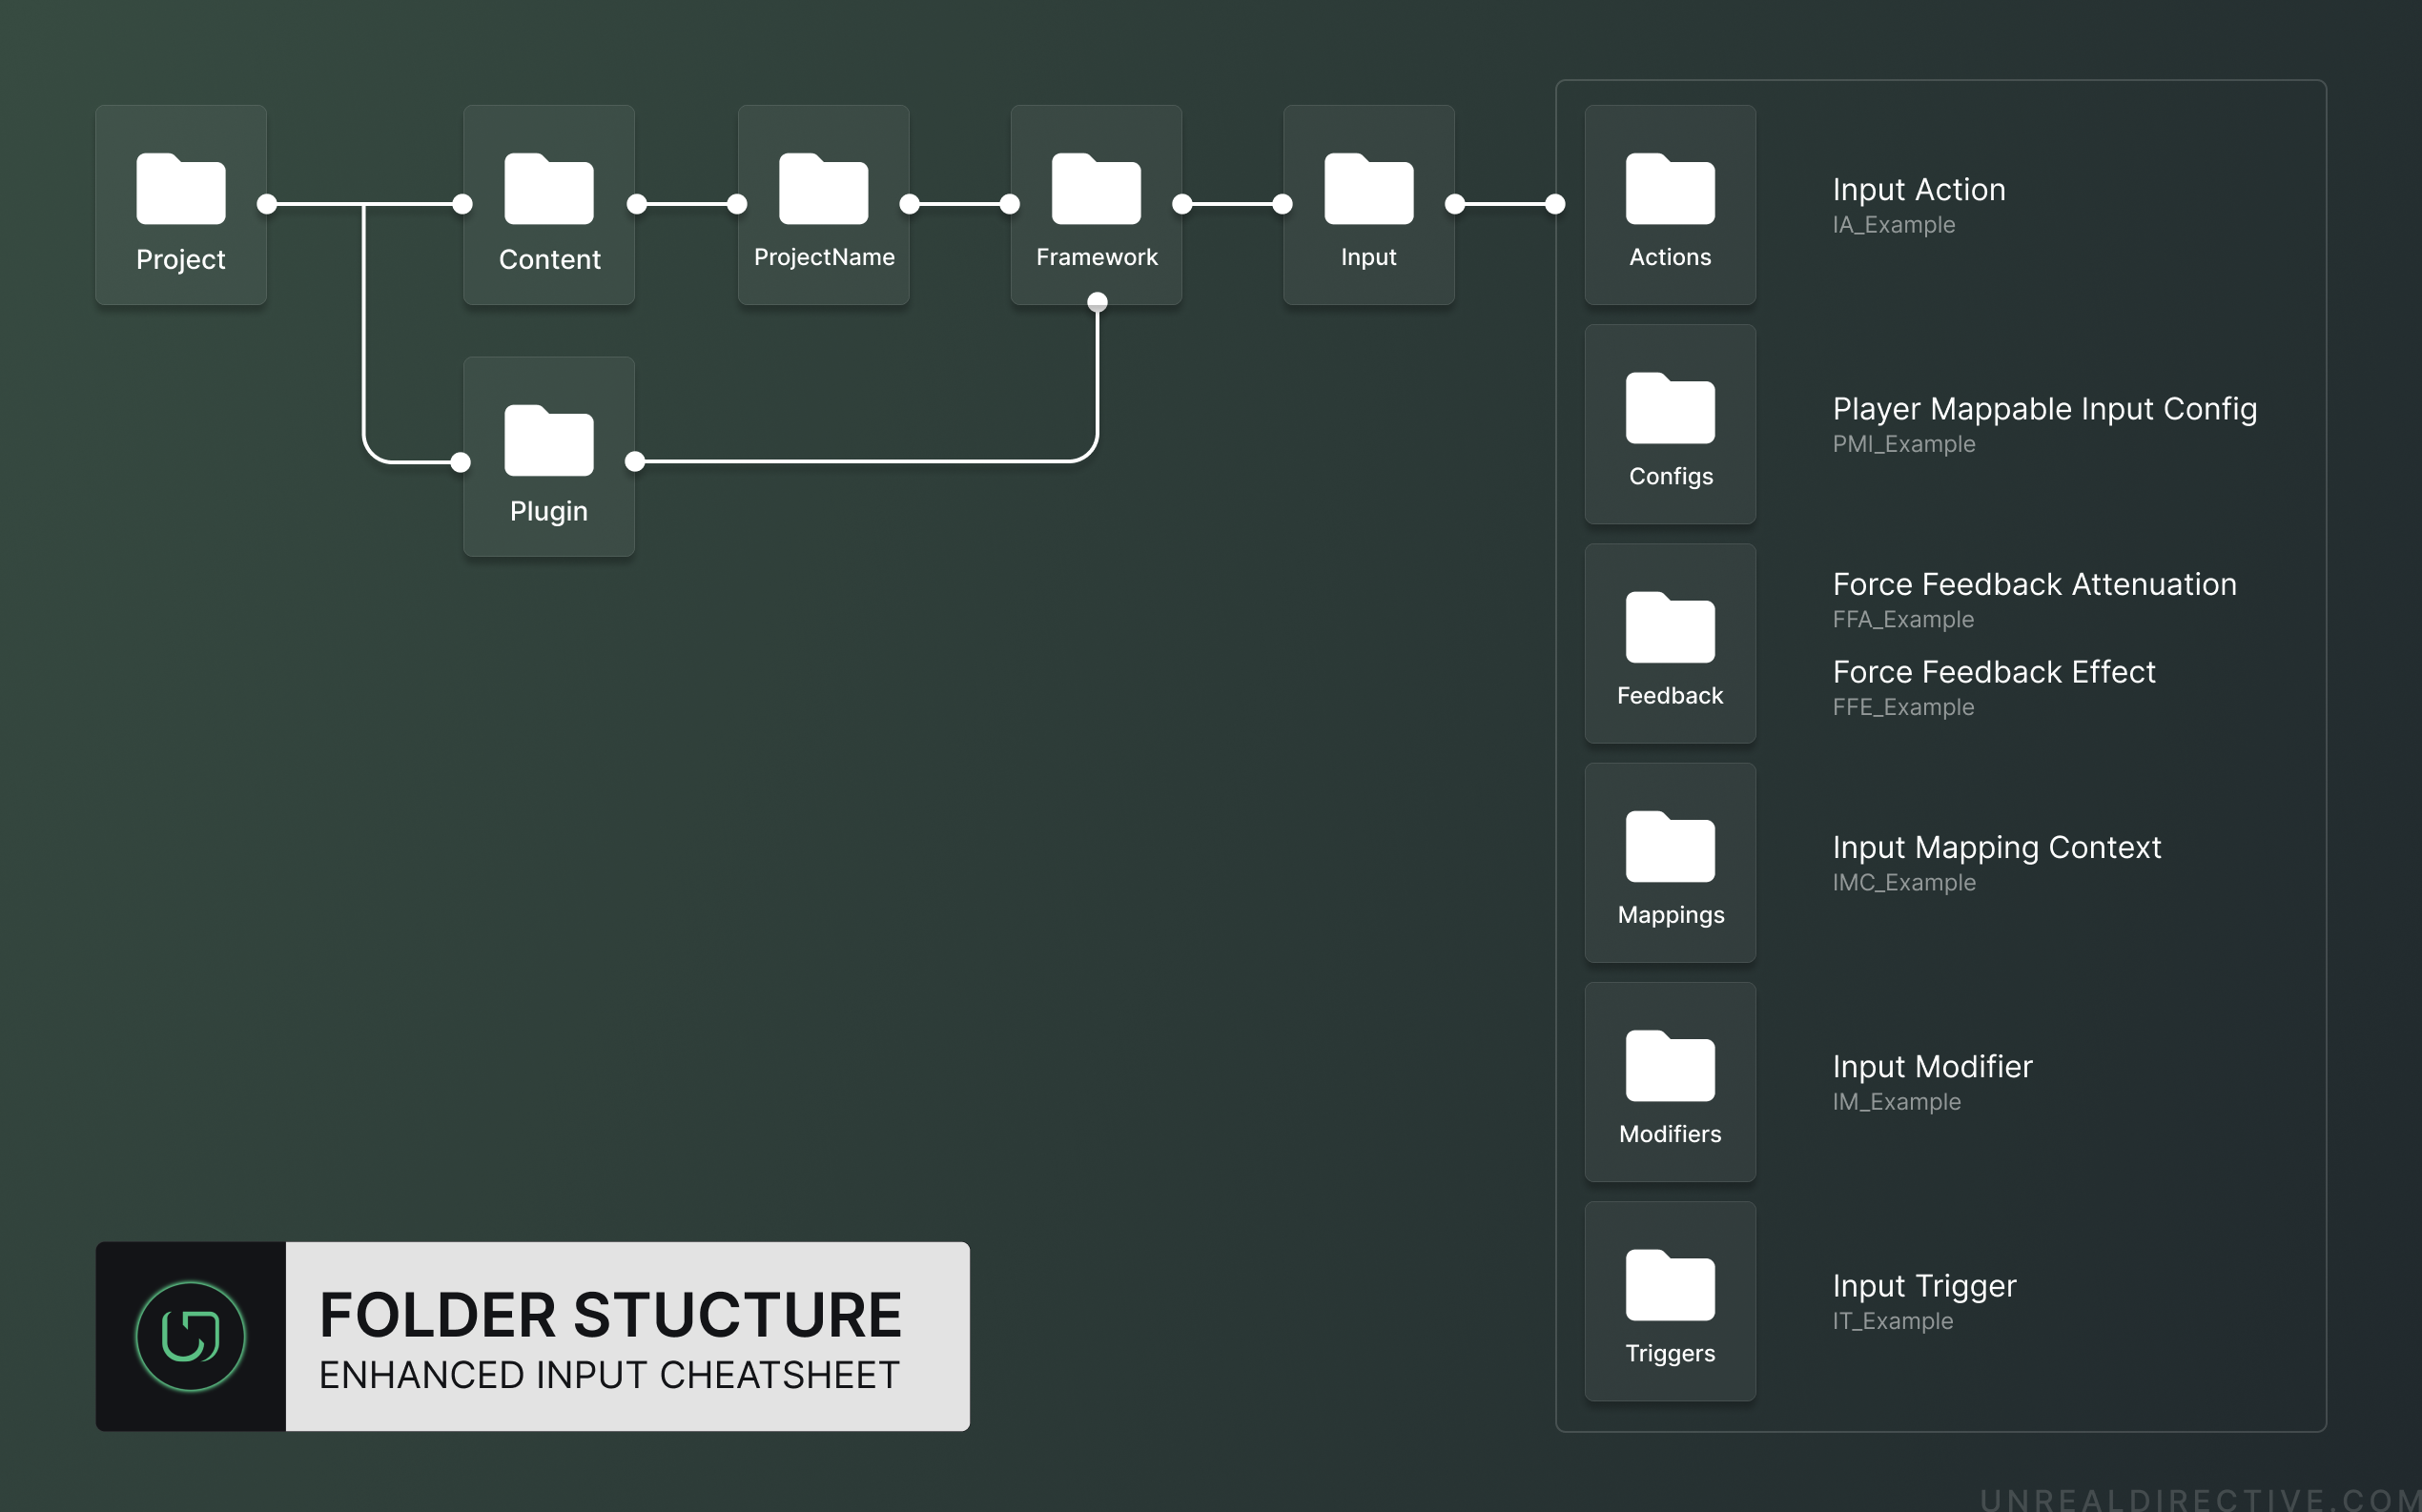
Folder Structure
Enhanced Input assets should be placed in specific sub-directories under a parent Input directory. This Input directory should be under a Framework directory, which contains your games framework assets (e.g., Game Mode, Game State, Player Controller, etc.).
Optimize for performance
Optimize your input handling code for performance, so that the game runs smoothly and responds quickly to player input.
For example, make sure constantly triggered inputs, such as mouse movement, does not trigger computationally heavy functions.